Python tkinter Checkbutton
- Events of checkbutton
- How to set a default value ( check or uncheck ) to a checkbutton
- Methods of Checkbutton select() deselect() & toggle()
- Enable or Disable Checkbutton
- Group of dynamic checkbuttons
- Validating Checkbutton with Entry widget ( Example )
- Understanding the Indicatoron Attribute
- Example : Food ordering menu system
- Difference between checkbox and radio buttons
- Examples Check box
- Questions
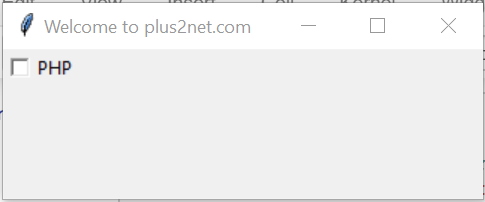
Tkinter Checkbutton reading the Checked or Unchecked value & setting the state to disabled or enable
import tkinter as tk
my_w = tk.Tk()
my_w.geometry("500x500")  # Size of the window

c_v1=IntVar()
c1 = tk.Checkbutton(my_w,text='PHP',variable=c_v1,
	onvalue=1,offvalue=0)
c1.grid(row=2,column=2)

my_w.mainloop() # Keep the window openonvalue=1 mean the variable c_v1 will get value 1 when checkbutton is clicked. or checked offvalue=0 mean the variable c_v1 will get value 0 when checkbutton is uncheckedHow to read the status ( get value of the associated variable ) of the check box. ?
my_val=c1_v1.get() #c1_v1 is the variable connected to checkbutton c1_v1.set(1)Events of checkbutton 🔝
Capturing click event of checkbox and display the value of the variableimport tkinter as tk
my_w = tk.Tk()
my_w.geometry("500x500") # Size of the window
def my_upd():
print('Check box value :',c1_v1.get())
c1_v1=tk.IntVar()
c1 = tk.Checkbutton(my_w, text='PHP',variable=c1_v1,
onvalue=1,offvalue=0,command=my_upd)
c1.grid(row=2,column=2)
my_w.mainloop() # Keep the window openimport tkinter as tk
my_w = tk.Tk()
my_w.geometry("500x500")
def my_upd():
print('Check box value :',c1_v1.get())
c1_v1=tk.StringVar()
c1 = tk.Checkbutton(my_w, text='PHP', variable=c1_v1,
onvalue='Yes',offvalue='No',command=my_upd)
c1.grid(row=2,column=2)
my_w.mainloop()Now let us use one Boolean variable
import tkinter as tk
my_w = tk.Tk()
my_w.geometry("500x500")

def my_upd():
    print('Check box value :',c1_v1.get())

c1_v1=tk.BooleanVar()
c1 = tk.Checkbutton(my_w, text='PHP', variable=c1_v1,
	onvalue=True,offvalue=False,command=my_upd)
c1.grid(row=2,column=2)

my_w.mainloop()
How to set a default value ( check or uncheck ) to a checkbutton 🔝
import tkinter as tk
my_w = tk.Tk()
my_w.geometry("500x500")

def my_upd():
    print('Check box value :',c1_v1.get())

c1_v1=tk.BooleanVar()
c1 = tk.Checkbutton(my_w, text='PHP', variable=c1_v1,
	onvalue=True,offvalue=False,command=my_upd)
c1.grid(row=2,column=2)
c1_v1.set(False) # Change  to True to check the Checkbutton by default

my_w.mainloop()import tkinter as tk
my_w = tk.Tk()
my_w.geometry("500x500")
def my_upd():
c2_v2.set(c1_v1.get())
print('Check box value :',c1_v1.get())
c1_v1=tk.StringVar()
c1 = tk.Checkbutton(my_w, text='PHP', variable=c1_v1,
onvalue='Yes',offvalue='No',command=my_upd)
c1.grid(row=2,column=2)
c1_v1.set('Yes') # Default value is kept as checked
c2_v2=tk.StringVar()
c2 = tk.Checkbutton(my_w, text='MySQL', variable=c2_v2,
onvalue='Yes',offvalue='No')
c2.grid(row=2,column=3)
c2_v2.set('Yes') # Default value is kept as checked
my_w.mainloop() Checkbutton Methods 🔝
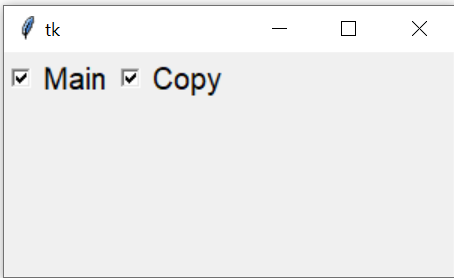
select() : To check the Checkbuttondeselect() : to Uncheck the Checkbuttontoggle() : to change the statusinvoke() : Same effect as button is clickedflash() : flash between active and normal colors but stay in the same stateimport tkinter as tk
my_w = tk.Tk()
my_w.geometry("300x150")
def my_upd():
if(c4_v.get()==1):
c4.deselect()
else:
c4.select()
c1=tk.Checkbutton(my_w,text='Main',command=my_upd,font=18)
c1.grid(row=1,column=1)
c4_v=tk.IntVar(my_w)
c4=tk.Checkbutton(my_w,text='Copy',font=18,variable=c4_v)
c4.grid(row=1,column=2)
my_w.mainloop()def my_upd():
c4.toggle()c1.select()def my_upd():
if (c_v.get()==1):
ckb2.flash()
else:
ckb2.invoke()
c_v=tk.IntVar(value=1)
ckb1=tk.Checkbutton(my_w,text='PHP',font=my_font,command=my_upd,variable=c_v,onvalue=1,offvalue=0)
ckb1.grid(row=0,column=0,padx=20,pady=20)
ckb2=tk.Checkbutton(my_w,text='Python',font=my_font,activebackground='red')
ckb2.grid(row=0,column=1,padx=20,pady=20)Enable or Disable Checkbutton 🔝
By using config we can manage the state option of the Checkbutton.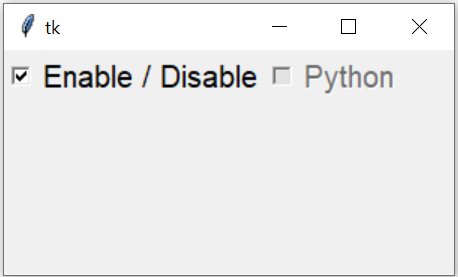
c1.config(state='disabled') # c1 is the Checkbutton
c1.config(state='normal')import tkinter as tk
my_w = tk.Tk()
my_w.geometry("300x150")
def my_upd():
if(c1_v1.get()=='Yes'):c2.config(state='disabled')
else:c2.config(state='normal')
c1_v1=tk.StringVar(my_w)
c1_v1.set('')
c1=tk.Checkbutton(my_w,text='Enable / Disable',variable=c1_v1,
onvalue='Yes',offvalue='',command=my_upd,font=18)
c1.grid(row=1,column=1)
c2_v1=tk.StringVar(my_w)
c2_v1.set('')
c2=tk.Checkbutton(my_w,text='Python',variable=c2_v1,
onvalue='Python',offvalue='',font=18)
c2.grid(row=1,column=2)
my_w.mainloop()Group of dynamic checkbuttons 🔝
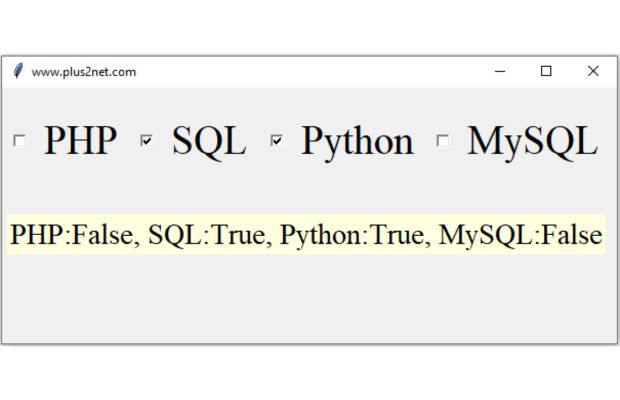
Here we are using a dictionary where the keys represent programming languages, and the values indicate their status. This dictionary can be populated with data sourced from databases or other external sources. Leveraging this data, we dynamically create a group of checkbuttons to display initial statuses.
Furthermore, note how changes in status are captured and displayed in real-time ( on a Label ) as the user interacts with the checkbuttons by checking or unchecking them.
import tkinter as tk
my_w = tk.Tk()
my_w.geometry("600x250")  # Size of the window
my_w.title('www.plus2net.com')
my_font1=('times', 30, 'normal') # for Checkbutts
my_font2=('times', 22, 'normal') # for the Label

languages={'PHP':0,'SQL':1,'Python':0,'MySQL':0}

col=0 # to increment the column value in grid layout
for option in languages:
    # create variable like PY_VAR0, PY_VAR1 etc with initial value
    languages[option]=tk.BooleanVar(value=languages[option])

    ck=tk.Checkbutton(my_w,text=option,variable=languages[option],
                      onvalue=True,offvalue=False,font=my_font1,command=lambda:my_upd())
    ck.grid(row=0,column=col,padx=5,pady=20)

    col=col+1 # increase the column value by 1 to place the next checkbutton
my_str=tk.StringVar(value='Data here')
lb1=tk.Label(my_w,textvariable=my_str, bg='lightyellow',font=my_font2)
lb1.grid(row=1,column=0,columnspan=col,pady=20,padx=5)
def my_upd():
    #print(languages["PHP"].get()) # status of any perticular language or Key
    str1=[] # blank list to store the status.
    for options in languages:
        str2=options + ':' + str(languages[options].get())
        str1.append(str2) # add the element to list
    str1=", ".join(map(str,str1)) # create string using all elements of the list
    my_str.set(str1) # Set the stringVar with the value
my_w.mainloop() # Keep the window openValidating Checkbutton with Entry widget ( Example ) 🔝
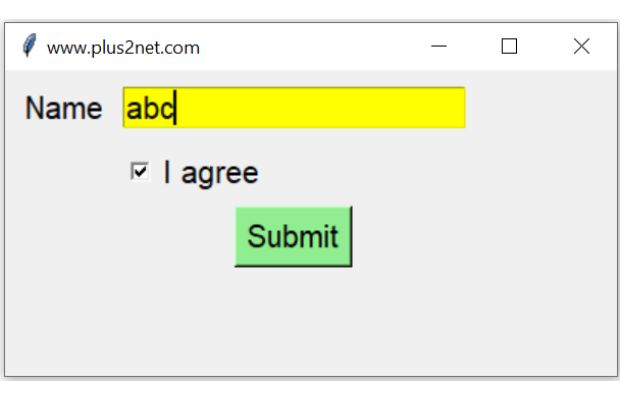
Two conditions are required here. The Entry box should have minimum 3 chars and the check box saying I agree must be checked.
The submit button remains in Disabled condition ( with different background colour ) if both conditions are not fulfilled.
import tkinter as tk
my_w = tk.Tk()
my_w.geometry('400x200')  # Size of the window
my_w.title("www.plus2net.com")  #  title

def my_check(*args):
    my_flag=False
    if(len(e1.get()) <3 ):my_flag=True # Minimum 3 char for entry
    if(c1_v1.get() != 'Yes'):my_flag=True # Check box is not checked
    if my_flag != True:b1.config(state='normal',bg='lightgreen')
    else:b1.config(state='disabled',bg='lightyellow')
l1=tk.Label(my_w,text='Name',font=20)
l1.grid(row=0,column=0,padx=10,pady=10)
str1=tk.StringVar()
e1=tk.Entry(my_w,bg='yellow',font=20,textvariable=str1)
e1.grid(row=0,column=1)
str1.trace('w',my_check)
c1_v1=tk.StringVar(my_w)
c1_v1.set('')
c1=tk.Checkbutton(my_w,text='I agree',variable=c1_v1,
                  onvalue='Yes',offvalue='',command=my_check,font=24)
c1.grid(row=1,column=1,sticky='w')
b1=tk.Button(my_w,text='Submit',bg='lightyellow', font=20,state='disabled')
b1.grid(row=2,column=1,padx=10,pady=5)
my_w.mainloop()  # Keep the window open
Validation of Checkbutton along with Entry widget in Tkinter to enable or disable submit button
Understanding the Indicatoron Attribute 🔝
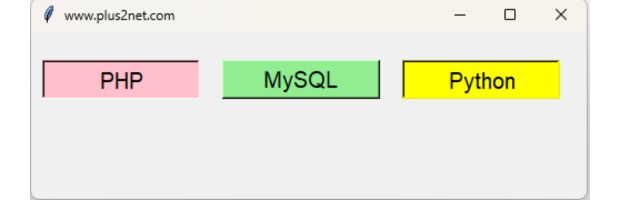
controls how the toggle state of the widget is displayed to the user.
When indicatoron is set to 1 (default value), the widget displays the standard radio button or checkbox next to the widget's text. This makes it clear that the widget represents a choice that can be turned on or off.
Setting indicatoron to 0 changes the widget to behave more like a push button.
This can be useful for creating a more customized or unique UI appearance while still using the toggle functionality of these widgets.
import tkinter as tk
my_w = tk.Tk()
my_w.geometry("500x150")  # Size of the window
my_w.title("www.plus2net.com") # Window title
font1=['Arial',15,'normal'] # Font type,size, style

c1_v1=tk.StringVar()
c1 = tk.Checkbutton(my_w, text='PHP', variable=c1_v1,width=12,indicatoron=0,
	onvalue='Yes',offvalue='No',font=font1,bg='lightgreen',selectcolor='pink')
c1.grid(row=2,column=1,padx=10,pady=25)

c2_v2=tk.StringVar()
c2 = tk.Checkbutton(my_w, text='MySQL',variable=c2_v2,width=12,indicatoron=0,
	onvalue='Yes',offvalue='No',font=font1,bg='lightgreen',selectcolor='red')
c2.grid(row=2,column=2,padx=10)

c3_v3=tk.StringVar()
c3 = tk.Checkbutton(my_w, text='Python', variable=c3_v3,width=12,indicatoron=0,
	onvalue='Yes',offvalue='No',font=font1,bg='lightgreen',
    activebackground="light blue",selectcolor="yellow")
c3.grid(row=2,column=3,padx=10)

my_w.mainloop()  # Keep the window open
Example : Food ordering menu system 🔝
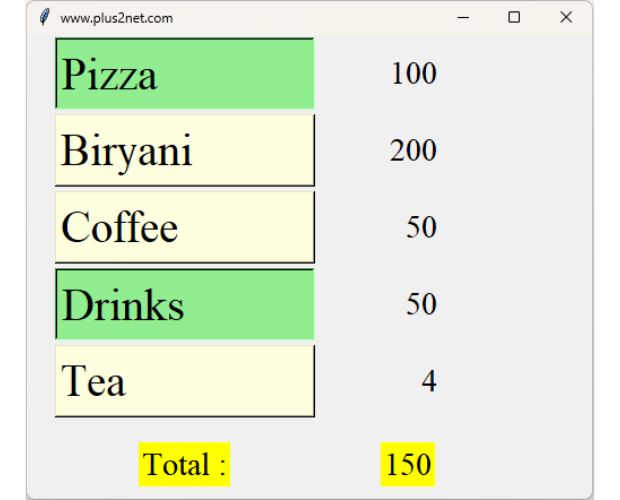
One dictionary is used with Food item name as key and Price as value. Using this dictionary the manu is populated by using checkbuttons with indicatoron attribute to select or unselect each item.
import tkinter as tk
my_w = tk.Tk()
my_w.geometry("500x410")  # Size of the window
my_w.title('www.plus2net.com')
my_font1=('times', 30, 'normal') # for Checkbutts
my_font2=('times', 22, 'normal') # for the Label

# Dicitionary as List of food items ( key ) with price (value)
my_items={'Pizza':100,'Biryani':200,'Coffee ':50,'Drinks':50,'Tea':4}

row=0 # to increment the row value in grid layout
my_var=[] # To hold the variable references
i=0 # reference counter
for option in my_items:
    my_var.append(tk.IntVar(value=0))
    ck=tk.Checkbutton(my_w,text=option,variable=my_var[i],
                      onvalue=my_items[option],offvalue=0,font=my_font1,
                      command=lambda:my_upd(),width=10,anchor='w',
                      bg='lightyellow',selectcolor='lightgreen',indicatoron=0)
    ck.grid(row=row,column=1,padx=25,pady=2,sticky='W')

    # show price to the right of the item
    lb=tk.Label(my_w,text=str(my_items[option]),width=5,font=my_font2,anchor='e')
    lb.grid(row=row,column=2)

    i=i+1    # increase the reference
    row=row+1 # increase the row  value by 1 to place the next checkbutton
def my_upd():
    my_sum=0 # To calculate the total price
    global my_var # call the refrence
    i=0 # reference counter
    for options in my_items:
        my_sum=my_sum  + my_var[i].get()
        i=i+1 # increase the reference counter
    my_total.set(my_sum) # Update the total value

lb1=tk.Label(my_w,text='Total :', bg='yellow',font=my_font2)
lb1.grid(row=row+1,column=1,pady=20,padx=5)

my_total=tk.IntVar(value=0)
lb2=tk.Label(my_w,textvariable=my_total, bg='yellow',font=my_font2,anchor='e')
lb2.grid(row=row+1,column=2,pady=20,padx=5,sticky='e')

my_w.mainloop()  # Keep the window open
Difference between checkbox and radio buttons 🔝
When one can be selected ( or True ) among the many choices then Radio button is used.When more than one option can be selected ( or True ) then checkbuttons can be used.
Examples Check box 🔝
How many languages you know ? Answer can be more than one of the given options like PHP, Python, JavaScript, JQuery. Here Checkbox or checkbuttons representing one language as option is to be used.Have you cleared the qualifying exam? The choice ( options ) are Yes, No or Appearing. Since one of the three options can be selected so here we will use Radio buttons.
Radiobuttons
Task List using Checkbuttons Toggle switches using Ttkbootstrap Checkbuttons
- Exercise on Checkbutton
- Create a list of checkboxes representing different languages? User can select the languages they know and a Label will display name of all languages selected. Once any language is unchecked the value inside Label should update.
Questions 🔝
- What is a Checkbutton widget in Tkinter?
- How do you create a Checkbutton in a Tkinter application?
- What is the purpose of the variable option in a Tkinter Checkbutton?
- How can you retrieve the current state (checked or unchecked) of a Checkbutton in Tkinter?
- In Tkinter, how do you associate a command function with a Checkbutton that executes when the Checkbutton state changes?
- Explain how to disable a Checkbutton widget in Tkinter. Provide an example code snippet.
- How do you create a group of Checkbuttons in Tkinter that share the same callback function but perform different actions based on which Checkbutton was toggled?
- Describe how to change the text of a Checkbutton widget in Tkinter dynamically during runtime.
- Can a Checkbutton in Tkinter be part of a Radiobutton group? Explain how Checkbuttons differ from Radiobuttons in their use.
- Provide an example code snippet that demonstrates how to create three Checkbuttons in Tkinter, each bound to a separate BooleanVar, and a button that prints the state of each Checkbutton when clicked.
Subscribe to our YouTube Channel here
This article is written by plus2net.com team.
https://www.plus2net.com

 Python Video Tutorials