Tkinter Attributes: The Building Blocks of Tkinter GUIs
- Common List of Attributes
- List of attributes of a Button
- config() to update attribute value
- List of Attributes of a widget
- Reading Value of the attribute
- Listing all values of all the attributes of a widget
- Checking availability of the attribute of the widget
- Example I : Enable or Disable a button by using state attribute
- Example II : Adding set of attributes to buttons
- Example III : Managing attributes on Button Click
- Simultaneously Configuring Multiple Tkinter Widgets
- FAQ: Frequently Asked Questions
Tkinter attributes are properties used to customize the appearance and behavior of GUI widgets. These attributes can control various aspects such as size, color, text, and functionality.
These attributes can be initialized at the widget's creation and adjusted dynamically at any stage of the application's lifecycle to modify its appearance or behavior.
bt1=tk.Button(my_w,text='I am a Button',bg='lightgreen',command=lambda:my_upd())text: String to be written over the Buttonbg: background colour of the Buttoncommand: On Click event handling when the button is clickedUsing the above attributes the output of our window with the button is here.
Common List of Attribues 🔝
Here are some of the most common Tkinter widget attributes widely used :- text: The text displayed on the widget.
- background: The background color of the widget.
- foreground: The foreground color ( font ) of the widget.
- font: The font used to display text on the widget.
- relief: The type of border around the widget.
- state: The state of the widget, which can be "normal", "disabled", or "active".
- cursor: The cursor to display when the mouse is over the widget.
- image: The image to display on the widget.
- command: The function to call when the widget is clicked.
List of attributes of a Button 🔝
Here is a full list of attributes of a Button widget, we can use them based on our requirement.['activebackground', 'activeforeground', 'anchor', 'background',
'bd', 'bg', 'bitmap', 'borderwidth', 'command', 'compound', 'cursor', 'default',
'disabledforeground', 'fg', 'font', 'foreground', 'height', 'highlightbackground',
'highlightcolor', 'highlightthickness', 'image', 'justify', 'overrelief',
'padx', 'pady', 'relief', 'repeatdelay', 'repeatinterval', 'state',
'takefocus', 'text', 'textvariable', 'underline', 'width', 'wraplength']Each widget page provides a comprehensive list of attributes and explains their usage with clear examples.
Attributes of Tkinter window, listing, reading and setting the values P-2
config() or configure() to update attribute value 🔝
To set the value of an attribute, you can use the `configure()` method. This method takes the attribute name and value as keyword arguments. For example, the following code sets the `text` attribute of a `Button` widget to "Click me!":button.configure(text="Click me!")button.configure(text="Click me!", background="red", foreground="white")import tkinter as tk
my_w = tk.Tk()
my_w.geometry("250x150")
set1={'fg':'red','font':['Arial',18,'bold'],
'text':'King & Queen','bg':'lightgreen'} #set of attributes with values
button = tk.Button(my_w, text="Hello, world!")
button.grid(row=0,column=1,padx=30,pady=25)
button.config(set1) # Update the attributes
my_w.mainloop()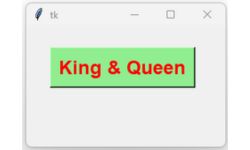
List of Attributes of a widget 🔝
We will get one dictionary of all attributes by using config(), so we can use the keys() method to get all the keys or options as a list of the object.print(button.config().keys())dict_keys(['activebackground', 'activeforeground', 'anchor',
'background', 'bd', 'bg', 'bitmap', 'borderwidth', 'command', 'compound',
'cursor', 'default', 'disabledforeground', 'fg', 'font', 'foreground',
'height', 'highlightbackground', 'highlightcolor', 'highlightthickness',
'image', 'justify', 'overrelief', 'padx', 'pady', 'relief', 'repeatdelay',
'repeatinterval', 'state', 'takefocus', 'text', 'textvariable', 'underline',
'width', 'wraplength'])Reading Value of the attribute 🔝
Any particular attribute's value we can display like this.print(button1['width']) # value of the option = 20 print(button.cget('bg')) # Use the key or the attribute to get valueListing all values of all the attributes of a widget 🔝
for options in button1.config():
print(options + ": " + str(btutton1[options]))activebackground: SystemButtonFace
activeforeground: SystemButtonText
anchor: center
background: green
bd: 2
bg: green
----
----import tkinter as tk
my_w = tk.Tk()
my_w.geometry("250x150")
for options in my_w.config():
print(options + ": " + str(my_w[options]))
my_w.mainloop()Checking availability of the attribute for the widget 🔝
All Attribues are not available with all the widgets.Note that l2 is a Label and sb1 is a Spinbox here.
if "bitmap" in l2.config():
#if "bitmap" in sb1.config():
print("Attribute is available")
else:
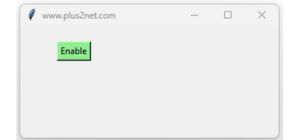
print("Attribute is Not available")Example I : Enable or Disable a button 🔝
Managing state attribute of buttons to enable or disable along with text in Tkinter P-3
In this example, we dynamically modify the button's attributes after its initial creation.
By managing
state attribute of a button we can Enable ( normal ) or Disable the button. 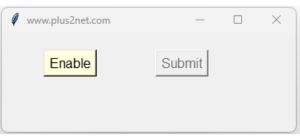
We can enable or disable a button and manage the text over the button by using the state and text attributes.
Here is the code to disable or enable 2nd button by using 1st button. The text also changes based on the status of the button.
state attribute can take three values: active, disabled, or normal
import tkinter as tk
my_w=tk.Tk()
my_w.geometry('350x150')
my_w.title('www.plus2net.com')

def my_upd(): # triggered once the button is clicked
    if bt2['state']=='disabled':
        bt2['state']='normal' # Enable the button
        bt1['text']='Disable' # update the text
    else:
        bt2['state']='disabled' # Disable the button
        bt1['text']='Enable'  # Update the text

bt1=tk.Button(my_w,text='Enable',font=22,bg='lightyellow',
              command=lambda:my_upd())
bt1.grid(row=0,column=0,padx=50,pady=20)

bt2=tk.Button(my_w,text='Submit',font=22,state='disabled',
              activebackground='lightgreen')
bt2.grid(row=0,column=1,padx=20,pady=20)
my_w.mainloop()
Example II : Adding set of attributes to buttons 🔝

Out of a set of 10 students, update the attributes of students having keys in multiple of 3, these students should have different background and font colours than the rest of the students.
import tkinter as tk
my_w = tk.Tk()
my_w.geometry("450x150")
students={1:'King',2:'Queen',3:'Jack',4:'Ron',
          5:'Alex',6:'Ravi',7:'Mike',8:'Teek',9:'Pink',10:'Geek'}
set1={'fg':'red','bg':'lightgreen'} #set of attributes with values
col=0 # starting value of column
for j in students:
    e = tk.Button(my_w, text=students[j])
    e.grid(row=1,column=col,padx=4,pady=20)
    if(j % 3==0): # divisible by 3
        e.config(set1) # update the attributes
    col=col+1 # increase the column value
my_w.mainloop()
Example III : Managing attributes on Button click
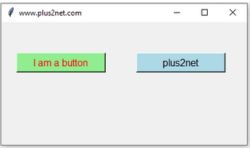
import tkinter as tk
my_w = tk.Tk()
my_w.geometry("400x200")  # Size of the window
my_w.title("www.plus2net.com")  # Adding a title
def my_upd():
    #str1=bt1.cget('text') # reading text
    str1=bt1['text'] # reading text
    #print(str1)
    if str1=='I am a button':
        #bt1['text']='Welcome' # setting value
        bt1.config(text='Welcome') # setting value
        bt2.config(state='disable',bg='blue')
    else:
        #bt1['text']='I am a button'
        bt1.config(text='I am a button')
        bt2.config(state='normal',bg='lightblue')

bt1=tk.Button(my_w,text='I am a button',background='lightgreen',
              command=lambda:my_upd(),font=18,fg='red',width=15)
bt1.grid(row=0,column=0,padx=25,pady=50)

bt2=tk.Button(my_w,text='plus2net',background='lightblue',font=18,width=15)
bt2.grid(row=0,column=1,padx=25,pady=50)

my_w.mainloop() # Keep the window openSimultaneously Configuring Multiple Tkinter Widgets 🔝
Tkinter does not provide a built-in way to configure multiple widgets simultaneously directly via a single config() call because the config() method is designed to be called on individual widget instances.This example demonstrates how to simultaneously configure multiple Tkinter widgets using a custom function that applies the same settings to each widget in a list. It efficiently updates attributes like foreground and background colors across several widgets.
import tkinter as tk
my_w = tk.Tk()
my_w.geometry("250x150") # width and height of window

def config_all(widgets, **options):
    for widget in widgets:
        widget.config(**options)

# Create multiple widgets
button1 = tk.Button(my_w, text="First one")
button1.grid(row=0,column=0,padx=5,pady=25)

button2 = tk.Button(my_w, text="I am 2nd")
button2.grid(row=0,column=1,padx=5,pady=25)

label3 = tk.Button(my_w, text="I am 3rd")
label3.grid(row=0,column=2,padx=5,pady=25)

# Configure multiple widgets simultaneously
config_all([button1, button2, label3], fg="blue", bg="yellow",font=22)

my_w.mainloop()
FAQ : Frequently Asked Questions 🔝
- Q. Is the list of attributes is common for all widgets ?
- Ans. No, there are some common attributes and specific attributes for the widgets.
- Q. Can I change the value of the attribute after creating ?
- Ans. Yes, you can use config() to update values of the attributes.
- Q. Can I manage the values of the attributes based on some conditions in my application ?
- Ans. Yes, based on requirement, dynamically the attribute values can be altered.
Questions
- What are the different states that a widget can be in and how can the state of a widget be changed?
- What is the relief attribute and how can it be used to change the appearance of a widget's border?
- What is the text attribute and how can it be used to change the text displayed by a label widget?
- What is the font attribute and how can it be used to change the font of a widget?
- What is the bg attribute and how can it be used to change the background color of a widget?
- What is the fg attribute and how can it be used to change the foreground color of a widget?
- What is the width attribute and how can it be used to change the width of a widget?
- What is the height attribute and how can it be used to change the height of a widget?
- What is the command attribute and how can it be used to specify a function to be called when a widget is clicked?
- How can the cget() method be used to get the current value of a widget's configuration option?
- How can the configure() method be used to change the value of a widget's configuration option?
- How can multiple widgets be configured at the same time using the config() method?
config() Validation Events
Subscribe to our YouTube Channel here
This article is written by plus2net.com team.
https://www.plus2net.com

 Python Video Tutorials